Happy christmas everyone! My friends and i had some time to kill at our last day of school before the holiday break. We made this in one hour, give or take half an hour... less on take and more on give because you know, christmas ;)
Joel Zakrisson - present sack, elves, lightings and background
Sofia Peinert - reindeer
Leo Toivio - snow and sleigh
Me - santa, posing, elves
I'd like to thank my friends for doing this awesome mini-project with me
So This basically started as a school project. I like making 3d models in my spare time and I would like to have a catalogue of what I have done so i can look back at them someday. This is where I will catalog all most of the 3D meshes/models i have done on Maya and some Blender too.
Friday, December 20, 2013
Tuesday, December 3, 2013
Learning How to Paint With Colors!
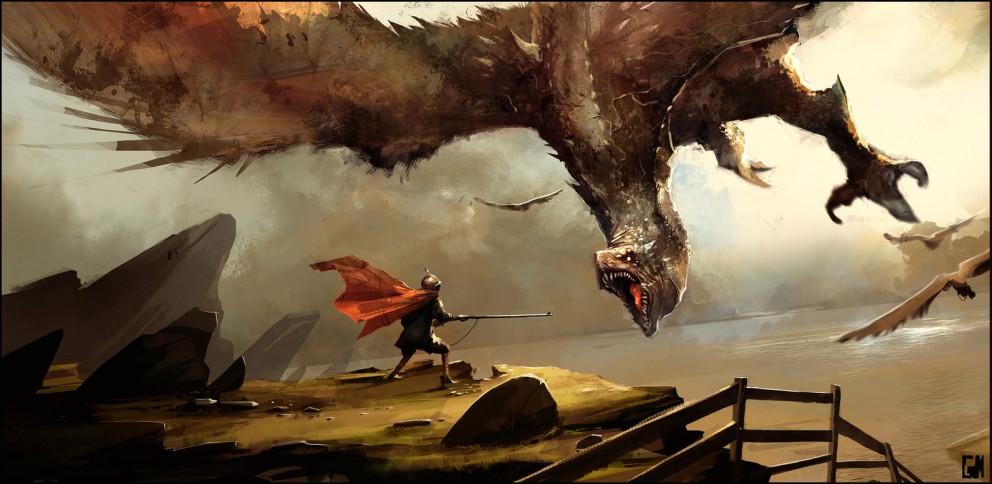
I'm good at sketching but painting in color and applying in lights and shadows is a hard thing for me to do. but don't know how to i will start and looking at YouTube videos doesen't seem to help so i decided to dive right in! I browsed the internet for a painted concept art and found this (look bellow please), have you seen it? Ok good, this painting is from Guillaume Menuel and the painting is called Shoot. Is it just me or the dragon looks like a cross between a dragon and an eagle.
I wonder how everything ended... Did the hero kill the Dragle? Or did the Dreagle killed the hero and? Analysis aside the painting is gorgeous and fits my style of art which would make it more easier to dedicate myself to the painting.
I've been working on this piece particularly for the purpose of giving me more experience on painting/textureing and color scheming. I've used Menuel's concept art and that random dead guy as a reference image to help me paint.
Guillaume Menuel: Shoot Now
Some Random Dead Guy
2013-11-11
I started to paint the largest object which is the dragon of concourse. I didn't know what color to chose so i have randomly chosen my second favorite color. The outcome of it was not how i expected it to be so i tried to changed it from blue to a more greyish color.
Of course i did not want to entirely copy the whole painting so i made some few changes to it. Fist of all i made the Dragle more of a classic dragon and i added a castle in the distance and don't forget the random dead guy.
It was really hard to focus on just one thing when I was painting because i want to jump around and paint all the other parts at the same time. In the I ended up not focusing at anything at all. this is what happened to the my painting below i first focused on making the dragon but i got bored and i did not know what to add more to the dragon.
I focused on one part
2013-11-12
Then I got bored and painted all the other parts
I colored everything in just to get a look on how its roughly going to look. The problem is i don't know what to focus on, i kinda want to do everything at the same time... i wish i had multiple hands and multiple mouses and tablets... I could be a TABLET GOD!! hahah.
2013-11-13
After talking to my friend who is the best painter in Photoshop i know -that's you Joel :)- I changed the color of everything and decided to work on the piece as a whole instead of just focusing on one object. Focusing on one object can cause a problem because when you have finished that object then you have the rest of the canvas to paint and the style of the whole painting might change over time. the object might then be the one which is out of place and needs to be repainted to fit the whole piece.
2010-11-14
The painting is shaping up nicely! I have taken out most of the guidelines and applied some of the shadows to the dragon i still have to apply lighting to the painting, not sure where though. I don't know how to apply depth in my painting but i'm sure there is a tutorial in Youtube somewhere :)
2010-11-20
It has been a busy week couldent work on the painting for a while added shadows and some other things focusing mostly on the right of the painting but im actually working on different parts of the painting now. not entierly done with the shadows. still need to ad and tweek some alot of the shadows still need to tweek some of the shadows but its getting there
I think i am done now. I took away the dead guy, it felt too cramped when looking at the painting. I learnt a lot of new techniques and painting this piece was really fun to do even though it was irritating at some times.
I am planing on picking up my old castle and knight concept and paint on it again. While doing this I am also making 3D models, Animations and textures for our school project which is going to be in a game. On the side i am making a more complicated model which is a mythical creature from the Philippines the Manananggal. go ahead Google it and you'll see what kind of creature it is.
Saturday, November 16, 2013
Grim textured
Well our main character of the game is textured and I dare say that he looks adorable! Even though I did not realise it but he looks like a cross between jawas and vivi in final fantasy 9.
Here's the UV-mapping and texturing of Grim
I could have made a better mapping by setting the both of the arms and wings together so that i could have more space and better resolution on both of them. i did that to the horns,hands and feet i don't know why i didn't do it on the arms, oh well there's always next time.
Heres the model without bump mapping
Here is the model with bump mapping
as a bonus a mental Ray rendering of Grim
Next thing I need to do is to animate this cute little thing. I'm gonna make him fly!
Thursday, October 24, 2013
Animation
I am supposed to chose which area of 3D modelling i am to focus on but seeing that i haven't learnt anything in-depth about animation. I decided to take animating instead of focusing on modelling which is what i really wanted to do because I think it is much better to have a well rounded skill set than to be focused one skill in this case.
At first glance it looked hard very hard to animate things but in reality the hard part is actually setting up the bones on a mesh and assigning the weights on the individual joints.
Here are the most basic terms of which you will need to know to understand what i am talking about
Maya's automatic skinning is ok and is really useful. I have also tried to manually apply the weights which gives you much better control over what part of the mesh is going to be affected by the joints and bones.
Here are the most basic terms of which you will need to know to understand what i am talking about
As far as i know there are 4 types of skinning (applying weights) a model.
- Wheight painting - Is the old school method of skinning where you had to apply the weights onto individuall vetecies
- Smooth bind - an updated vesion of weight painting. You no longer need to paint in the weights indivirually and it binds the mesh and the bones smoothly. It doesit automatically but you might not get the wanted result
- Rigid bind - same as smoothbinding but more rough on the binding
- Interactive bind - This is where you can individually determine in what range the joints of the bones are going to affect the mesh
Maya's automatic skinning is ok and is really useful. I have also tried to manually apply the weights which gives you much better control over what part of the mesh is going to be affected by the joints and bones.
Saturday, October 12, 2013
Uv Mapping, My Old Friend
So we have started working with Uv-mapping in school and if you have read my posts on UV-mapping then you would know that UV stands for universal view. Simply put you have to layout you 3D model to a flat layer so that the parts of it would be distinguishable.
At start your UV mapping will look like this. A bunch of wires bunched together in chaos but soon when you will be able to tame and make everything distinguishable.
So since I have experience with mapping I'll show you the most basic tools that you will use while mapping.
1. Is the fancy unfold tool. It can only unfold one shell at a time and but the good thing about it is that you can see how the UVs become unfolded, right before your very eyes. (Thank you Joel for showing me this tool).
2. is the flip horizontal/ vertical tool. Best done when selecting individual shells.
3. The cut UV edges tool. this tool is crucial when you have a complicated shape like a character or something in with complicated shapes.
4. a less fancy unfold tool but you can unfold a lot of different shells at once.
5. level the vertices in either way the images is kind of self explanatory.
Lastly you should use the checkered texture to see if you have unfolded the UVs properly. The checkered texture should be evenly distributed.
Saturday, October 5, 2013
Schools back!!
And that's why i haven't have the time to post for a long time. Homework and many stressful days has gone by since school has started again. But the good thing in my school is that I am going to make a game in one of my courses. Naturally I am chosen as the designated 3d modeller, texturer and eventually animater.
Having this project will give me a clear set of goals on what to do and make. Also this forces me to go into areas of 3d modeling that I am not particularly familiar of, such as animation, rigging and rendering. Even now I continue to learn about modelling.
Remember this; I'm not just saying it to you I'm also saying it to my future me incase I forget:
I solved the problem when scaling an edge loop in a special duplicated object. It is as simple as moving the pivot to the center of the body and viola! No more overlapping mirrors when scaling.
When you are done with an object try the 'merge vertices' option It makes duplicate special ten times easier to finalize it also gets rid of all unnecessary/duplicated faces.
I don't know how I have missed bit there is apparently a coordinate modifier where you can individually edit the coordinates of each vertex. It's the top left of the main window hiding somewhere in there
I'm really looking forward to learn everything that has to do with modeling... I just need time. Anyways. I've done alot of models during this past month and hopfully all of them are going in the game.
Sunday, September 1, 2013
Work related post
I've been working on my fist official job and the first thing that I did is that I made a video talking about a personal affiliation to the city, we also made a video of interviewing people. I did the editing on both of them. Everything was compiled in an iPad, it was somewhat a pain in the as to use but actually simple once you get the hang of it... But i still don't like apple tho
The last week we painted a mural painting with our concept art. Some of them made it to the wall some of them didn't.
One of my concept made it at least ^_^ it's a round ball which look like the death star xD
Here is the video that I made. I forgot to upload the other one and I am to lazy to find it on the internet. Oh and it's on Swedish by the way so sorry if you cant understand it.
The best part of work is this is the first time I have been payed for making a model of something. Well they only needed the pictures of the model, but still :D I accidentally deleted my screenshots and the save file of the model but here's the picture of it at least
Monday, July 22, 2013
Ohhh My God it's a Sign!
wellp yes it is ^^ it's the fist mod that i have ever made, actually it's not true I tried to make a mod in fallout 3 with blender but yeah it did not go so well. I had no idea how to use Nifscope and the other programs that was needed to put my model in the game.
Anyways I made a model in the game called TUG which is awesome by the way, you should check it out ;) The game is in alpha and they will certainly add more content to it but as of now I just wanted to take the chance and make something in it before they put more stuff in the game.
In Game
UPDATE!!!
After i made the sign I actually made more stuff for TUG... Look! it's a camp ^^ They actually have a contest right now about making a mod in the game, it's nothing big the prize is just honor but still ^^
Saturday, July 6, 2013
Bump Mapping a Helmet
I needed a step up on the difficulty both on Uv mapping and texturing so I made a helmet another thing that I model very frequently :p Actually the Uv mapping of the helmet was not at all hard, the Eco sword that I made was actually harder to map. The added bump mapping means that there is more depth on the object, anyways I'm a little short for words right now so here's the helmet
This was the helmet before the division (smoothing)
After the smoothing
Here is a bonus plant ^_^
Saturday, June 29, 2013
The Living Sword
I am still going through the videos that i linked on in my previous post but I couldn't help my self I just wanted to try my Wacom again. I wanted to make a sword because I love modeling swords, it makes me feel like a blacksmith :p and on the plus side they are also easy to Uv map so I could jump into texturing imidiatly. There is a catch decided to make something different, somthing not done before, (after very quick search on google) a sword that is alive i might say... so i went for a... Plant sword.
I dont know why, but i did it because i can!!
I'm not quite happy with the look of the blade but I had to do something so i chose a color combination that can never go wrong, black and red.
Here comes the room for improvement part for me, let me explain. The thing is when Uv mapping one has to "cut" some edges to be able to make the mesh distinguishable and paintable on a flat area. That edge that has been "cut" are then separated to one end to the other and as a result are painted in different ways. There is an picture of this bellow.
That black line which runs along the flower is the edge that i cut and it along the handle too but it is almost unnoticeable because of the way the handle was painted.
First Textured Model
As you may know by now i got my hands on a Wacom drawing pad via my mom ( salamat mama!! :D ). Everything in photoshop is ten times way more easy to do, finally no more painting with a mouse ^_^ This is my first model ever to have a texture that is completely done by yours truly.. moi :p and so without further adieu here it is:
Last but not her least: The Awesome Closeup
There is a nice video tutorial about how to make a treasure chest here. I didn't use this tutorial but now that I think of it, it would make everything much more easier to do
Ohh and by the way UV mapping is still a pain in the a** to do. It took me approximately three hours to finish the mapping and another three or maybe five to finnish the texturing as it turnes out i love texturing :D On another side note TIL (Today I Learned) that the abreviation of UV stands for Unified View
Wednesday, June 26, 2013
Video Tutorial Reviews Incoming
It seems that my investor... aka mom :) is going to buy me a Wacom drawing pad. So I've decided to look at roughly about 10 or maybe more video tutorials on Youtube. I will update this post and link all useful tutorials that i have looked at.
The videos that I'm going to look at are mostly tutorials on painting and UV mapping and finally I am going to texture the treasure chest that I will make later.
Here are the links that i am planing on going through tommorow I will sort this and categorize them later. Just to let you know i chose these videos randomly so i do not know the quality of the content until I have watched them.
Art
This is about making a portrait with a photo reference. It's kind of long and the maker of the video goes through the basics of Photoshop but I did learn a few tricks about PSh. Watching the video thought me a few on the techniques of painting and the result is this:
On to the other videos... Man this is taking longer than i expected :)
Now this one is aboout the laso tool and Chris Oatley talks about how little acidents in the painting makes it more lively as controling everything in the painting may kill the art. He talks about alot of interesting aspects of speed painting and painting techniques.
Ok I won't be able to go through all this videos at this time, I'm too exited with my Bamboo Wacom :D But in time I will try to go through all the videos update this page
Update:
June 29 2013
With four or five videos behind me this is probably the best tutorial video in my picks that I have seen so far. He talks about a lot things, granted that the video is also about half an hour long. He shows different ways of making a simple but elegant art using masks and gradients. He also show different tricks and shortcuts on how to use the layer panels. The best of all i now know the shortcut for merging different layers :p which is ctrl E.
http://www.youtube.com/watch?v=mFRHTs8-KVw
http://www.youtube.com/watch?v=RYgjTWiR_GE
Art
This is about making a portrait with a photo reference. It's kind of long and the maker of the video goes through the basics of Photoshop but I did learn a few tricks about PSh. Watching the video thought me a few on the techniques of painting and the result is this:
On to the other videos... Man this is taking longer than i expected :)
Now this one is aboout the laso tool and Chris Oatley talks about how little acidents in the painting makes it more lively as controling everything in the painting may kill the art. He talks about alot of interesting aspects of speed painting and painting techniques.
Ok I won't be able to go through all this videos at this time, I'm too exited with my Bamboo Wacom :D But in time I will try to go through all the videos update this page
Update:
June 29 2013
The Video on this link talks about different painting techniques and how painting is a way of expressing ones self. This tutorial focuses on transparency locking and again the artist likes to have little mistakes on the painting ;) This video has thought me how to use the transparency locking. I had no idea that one could do that... I feel like such a noob :}
With four or five videos behind me this is probably the best tutorial video in my picks that I have seen so far. He talks about a lot things, granted that the video is also about half an hour long. He shows different ways of making a simple but elegant art using masks and gradients. He also show different tricks and shortcuts on how to use the layer panels. The best of all i now know the shortcut for merging different layers :p which is ctrl E.
http://www.youtube.com/watch?v=mFRHTs8-KVw
Maya
http://www.youtube.com/watch?v=6-yXiIYKEHohttp://www.youtube.com/watch?v=RYgjTWiR_GE
Monday, June 24, 2013
Coloseum and Stuff
I'm here in Norrköping staying with my pearents and all i have is this
laptop that can barely play any games so i made some random stuff that
took no time to make. The things that I made is a building with a
smashed roof, a skelly concept and a Coloseum made out of simple
objects. im planing on continuing the skelly concept and I'm looking at
the skeleton model of Elderscrolls: Morrowind
Monday, June 17, 2013
Shield
OMG its a shield it's so cute with its heatherieness hahhaha. nah but Made a shield with a simple UV-layout and by the way i still don't have a digital pad in case your wondering . I made the emblem my self tracing a picture on Google and adding effects on it other than that i haven't done anything much, it's because of a new game that i'm playing World Of Battles. The game is more like Rome Total War but with a fantasy twist to it. anyways i'm digressing there are the images if you haven't already looked at them
Sunday, June 16, 2013
New Gasmask
I had nothing else to do and i couldn't come up with a new thing to make so i decided to try to re-make the gas-mask that i made in Blender but in Maya instead. Right from the start I noticed that when i was playing/making models in blender it felt like i had more freedom to do what ever i like to the mesh and get the result that i wanted without exerting much so effort into it. Then again these are two different types of companies with different coders. One can always import the models you made into Maya so there's no problem :) I'm not sure if it works both ways though.
The way that I made these meshes was that i started out from a simple cube and extruded and moved some of the faces till I got the shape that i wanted to have. Now these models are very high poly and i did not pay any attention to how many there was the only thing that i focused on was to make the model look smooth. Now that you have waved through the wall of text you deserve to see the pictures :) and here they are:
Here is the blender Mask
Here is the one i made in Maya
Subscribe to:
Comments (Atom)